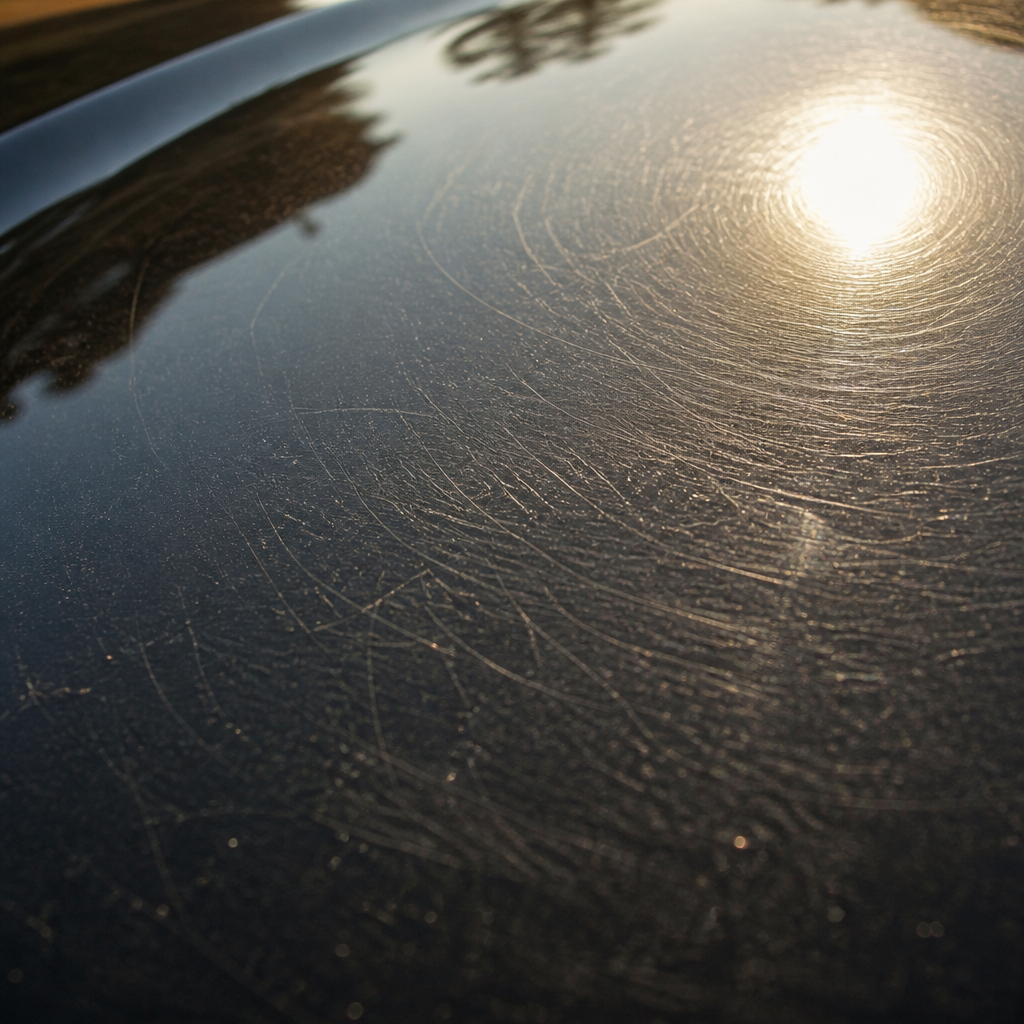
Look at your car under direct sunlight and you will almost certainly see it: a web of fine circular scratches swirling across the hood, dulling what should be a mirror-like finish. Most vehicle owners in the Chicago suburbs assume this is just normal wear they have to live with. It is not. Paint correction in Glendale Heights, IL is a controlled, multi-stage machine polishing process that physically removes those defects from the clear coat, restoring optical clarity without repainting. The problem is that most people have no idea what real paint correction involves, what it costs in terms of clear coat depth, or how to tell a genuine correction from a glorified wax job. This guide covers all of it.
Table of Contents
- Quick Takeaways
- What Is Paint Correction, Really?
- Understanding Paint Defects: Swirl Marks, Scratches, and Water Spots
- The Correction Process, Step by Step
- Multi-Stage Machine Polishing Explained
- One-Step vs. Two-Step vs. Three-Step Correction
- Why Chicago Suburb Roads Accelerate Paint Damage
- Paint Correction Before Ceramic Coating: Why Order Matters
- Frequently Asked Questions
- References
Quick Takeaways
| Key Insight | Explanation |
|---|---|
| Paint correction physically removes defects | It levels the clear coat using abrasives, not masking agents. There is no filler involved in a real correction. |
| Swirl marks come mostly from improper washing | Automatic brushed car washes, dirty wash mitts, and circular drying motions are the leading causes of swirl mark patterns on dark-colored vehicles. |
| Water spots can etch permanently if left too long | Mineral deposits from hard water bond to and chemically etch the clear coat. Chicago tap water is relatively hard, making this a real concern for local owners. |
| Not all scratches are correctable by polishing | If a scratch catches your fingernail, it has penetrated beyond the clear coat into the base coat or primer. That requires touch-up paint, not polishing. |
| Multi-stage correction delivers superior results | A two- or three-stage process uses a cutting compound first, then progressively finer polishes, removing deeper defects and eliminating haze left by the cutting stage. |
| Clear coat depth limits how much correction is safe | Most clear coats start around 50 microns thick. Safe polishing over a vehicle's lifetime should remove no more than 10 to 15 percent of that total depth. |
| Ceramic coating amplifies every defect underneath it | A coating locks in whatever condition the paint is in. Applying it over uncorrected paint permanently magnifies swirl marks and water spots through the coating's high gloss. |
What Is Paint Correction, Really?
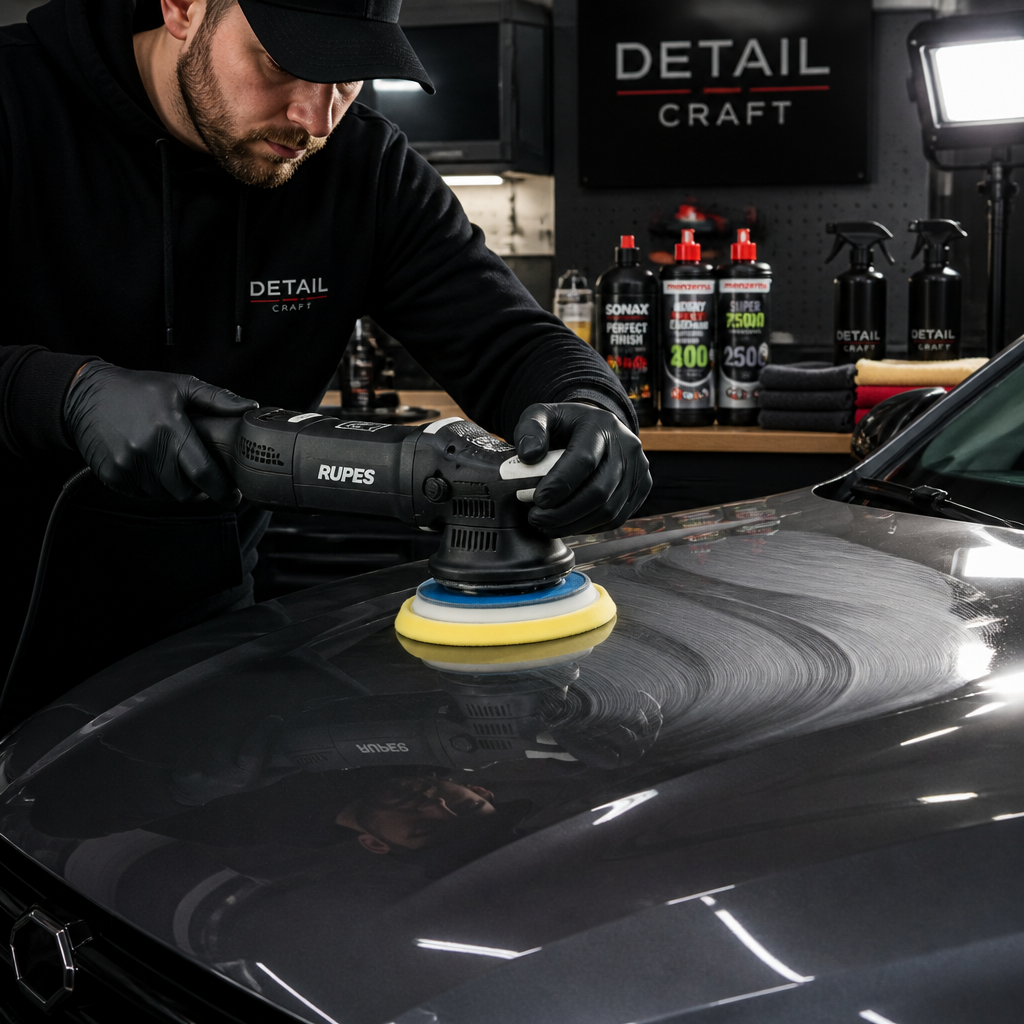
Paint correction is not a polish and wax. It is not a detail spray buffed out by hand. It is a measured, stage-based refinement process that uses machine polishers, abrasive compounds, and foam or microfiber pads to physically level microscopic defects in a vehicle's clear coat, allowing light to reflect evenly across the surface again.
The clear coat is a transparent resin layer that sits on top of your base coat and gives your paint its depth and gloss. Defects like swirl marks, fine scratches, and water spot etch pits are not in the paint color itself; they are in this clear layer. Because the clear coat is transparent, these irregularities scatter light in every direction instead of reflecting it back in a clean, flat plane. The result is that dull, milky, swirl-covered finish you see on most cars that have been washed regularly at a brush-type automatic car wash.
Paint correction fixes this by carefully abrading the high points of the clear coat down to the level of the low points, so the surface becomes uniformly flat and optically clear again. Done correctly, the difference is dramatic. Done incorrectly, you can introduce new haze or burn through the clear coat entirely.
Understanding Paint Defects: Swirl Marks, Scratches, and Water Spots
Before any correction can be planned, a professional detailer needs to understand exactly what type of defect is present, how deep it goes, and what caused it. These are not interchangeable problems, and they require different approaches.
Swirl Marks
Swirl marks are circular micro-scratches that appear most prominently under direct sunlight or artificial spotlights. They form during washing and drying when dirt or grit is trapped between the paint surface and a wash mitt, sponge, or drying towel. Automatic car washes with spinning nylon brushes are a particularly aggressive source, dragging abrasive grit across the paint in arcs that produce the characteristic spider-web pattern. On dark colors like black, navy, or deep red, swirl marks are immediately obvious. On white or silver vehicles, they are there too - they just require stronger lighting to reveal.
Surface Scratches vs. Deep Scratches
Surface scratches are linear, unlike swirl marks, and are visible in most lighting conditions. They typically result from a branch brushing the door, a jacket zipper dragging across the quarter panel, or someone leaning against the car with abrasive clothing. Most surface scratches affect only the clear coat and are fully correctable with machine polishing.
Deep scratches are a different problem entirely. If a scratch has broken through the clear coat into the base coat or primer, machine polishing will not fix it. The fingernail test is the simplest diagnostic: if your nail catches in the scratch, it is too deep for polishing alone. Those defects require touch-up paint or panel respray before any coating goes on.
Water Spots and Mineral Etching
Water spots are among the most underestimated paint threats, especially in the Chicago suburbs where municipal water contains dissolved minerals. When water sits on paint and evaporates, it leaves behind calcium and magnesium deposits. These deposits can bond chemically to the clear coat surface. Given enough time and heat from sunlight, they etch into the clear coat itself, creating shallow pits that a simple wash cannot remove. Stage one water spots (surface deposits) respond well to a dedicated chemical water spot remover or clay bar treatment. Stage two and stage three spots, where the mineral has physically etched the surface, require machine polishing to correct.
A proper correction starts well before a machine polisher touches the paint. The vehicle needs to be thoroughly washed and decontaminated so bonded debris, embedded fallout, and surface grime do not interfere with polishing. If contamination remains on the paint, it can cause additional marring during the correction process.
The Correction Process, Step by Step
A professional paint correction at a shop like Hersheys Detailing in Glendale Heights is not a two-hour job. For a full two-stage correction on a midsize sedan, expect five to ten hours of shop time depending on paint condition, vehicle size, and the number of defects present. Here is what that process actually looks like.
Step 1: Wash and Iron Decontamination
The vehicle gets a thorough hand wash using the two-bucket method to avoid dragging grit across the paint. After washing, an iron fallout remover is sprayed across the paint, wheels, and lower panels. This chemical dissolves embedded ferrous particles from brake dust and rail dust, which are invisible to the eye but abrasive enough to cause marring during polishing. You will see the product bleed purple-red as it reacts with iron contamination. This step is mandatory, not optional.
Step 2: Clay Bar Decontamination
After the iron removal step, a clay bar is worked across the paint surface with a slick lubricant. The clay grabs and mechanically pulls out bonded contaminants, tree sap residue, industrial fallout, and water spot mineral deposits that the wash and iron treatment could not remove. Running your hand across properly clayed paint reveals the difference immediately: it feels like glass instead of sandpaper. Skipping the clay step means polishing over contamination, which at best reduces correction quality and at worst introduces new scratches from the abrasive particles being dragged under the pad.
Step 3: Paint Inspection Under Correction Lighting
Before any machine touches the paint, the detailer inspects the entire surface under high-intensity LED or halogen lighting that reveals defects invisible in normal ambient light. This is where experience matters more than equipment. Not every mark justifies aggressive correction. A skilled detailer identifies which defects are in the clear coat, which are too deep to correct safely, and what the overall paint thickness can safely tolerate. A paint depth gauge is used to measure clear coat thickness at multiple points across every panel, identifying areas that have been corrected before, repainted, or are thinner than factory spec.
Step 4: Machine Polishing (Single, Two, or Three Stage)
This is where the actual correction happens. Depending on the level of defects present, the detailer selects a compound, polish, and pad combination appropriate to the correction stage. A dual-action (DA) polisher or rotary polisher is used with deliberate, overlapping passes at controlled machine speeds. The process is methodical and slow. Working panel by panel, the detailer checks their work under inspection lighting after every section before moving on.
Step 5: Panel Wipe-Down and Final Inspection
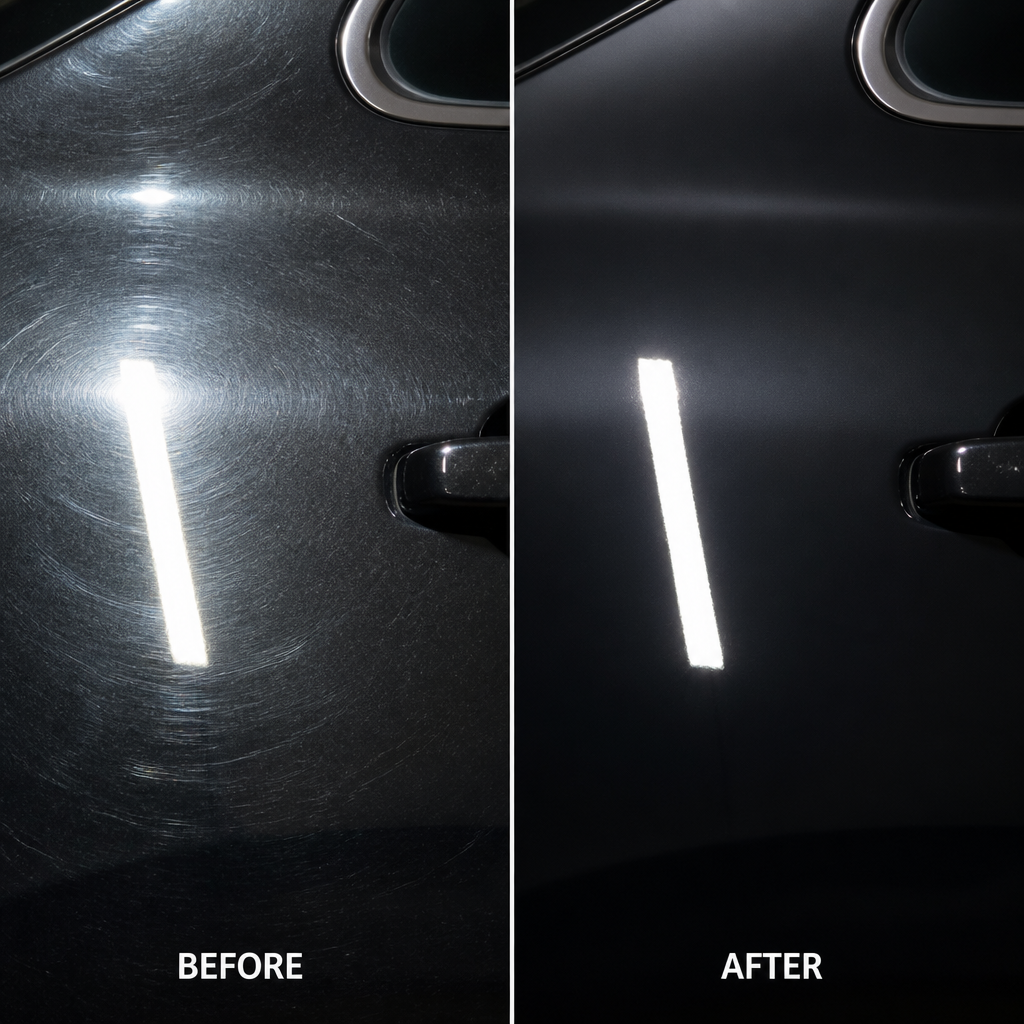
After polishing, each panel is wiped with an isopropyl alcohol (IPA) solution to remove all polish residue and oils. This is critical because polish oils can temporarily mask remaining defects, making the paint look better than it actually is. The IPA wipe strips everything and reveals the true corrected finish. A final inspection under lighting confirms the level of correction achieved before any protective coating is applied.
Pro tip: Ask your detailer to photograph each panel under inspection lighting before and after correction. Any professional shop doing real correction work will have this documentation ready. If they cannot provide before-and-after shots under proper lighting, the correction may not be as thorough as advertised.
Multi-Stage Machine Polishing Explained
The phrase "multi-stage polishing" describes a polishing sequence that uses progressively finer abrasives across multiple passes to first remove defects aggressively and then refine the surface to a high-gloss finish. Each stage serves a specific purpose, and skipping stages produces inferior results.
The Cutting or Compounding Stage
The first stage uses a heavy-cutting compound paired with a microfiber or wool cut pad. This aggressive combination removes medium to severe defects: heavy swirl marks, oxidation, light sanding marks, and etching. The compound abrades the clear coat more aggressively than a polish, leveling out the damaged surface quickly. However, this stage leaves its own trail of micro-marring and haze in the finish. The paint looks cleaner than before, but it is not finished. Stopping here and applying a coating would mean locking in that compound haze.
The Polishing or Refining Stage
The second stage uses a medium or fine polish with a softer finishing pad. This step removes the micro-marring left by the cutting stage and increases the gloss, clarity, and depth of the finish. For vehicles with moderate swirl marks and no severe defects, this stage can sometimes be the only one needed. For heavily damaged paint, it follows the cutting stage to refine what the compound left behind.
The Finishing Stage (Three-Stage Correction)
A true three-stage correction adds a final finishing polish with an ultra-soft pad to achieve the highest possible level of gloss and eliminate any remaining fine haze. This level of correction is most appropriate before a ceramic coating installation, where the coating's own reflectivity will amplify every remaining imperfection. At Hersheys Detailing, the two-step correction included with their ceramic coating packages addresses both the cutting and polishing stages, preparing the surface at a standard that a coating actually deserves to go on.
Pro tip: Rotary polishers cut faster than dual-action polishers but require considerably more skill to use safely. In the hands of an untrained operator, a rotary can burn through the clear coat on edges and body lines within seconds. A dual-action polisher is far more forgiving for technicians in training, but a skilled operator with a rotary can achieve correction results that a DA simply cannot match on heavily oxidized paint.
One-Step vs. Two-Step vs. Three-Step Correction
| Correction Type | Best For | What It Fixes |
|---|---|---|
| One-Step Enhancement | Daily drivers with light swirling, vehicles needing a gloss boost before wax or sealant application | Light swirl marks, minor haze, surface oxidation. Uses a medium-cut polish and single pass. Does not address deeper defects or compound haze. |
| Two-Step Correction | Vehicles with moderate to heavy swirl marks, water spot etching, and light scratches. Standard prep for ceramic coating. | Compound stage removes moderate defects; polish stage refines and eliminates compound haze. Results in high-clarity finish suitable for coating. |
| Three-Step Full Correction | High-end or collector vehicles, heavily damaged paint, pre-coating prep where maximum gloss is required | Cuts, polishes, and ultra-refines the surface. Highest possible defect removal and gloss output. Most time-intensive and most clear coat consumed. |
Why Chicago Suburb Roads Accelerate Paint Damage
Owners in Carol Stream, Wheaton, Bloomingdale, and Glendale Heights face paint threats that drivers in warmer, drier climates simply do not deal with at the same intensity. Road salt is the most obvious one. Illinois applies salt and chemical de-icers across suburban roads from November through March. That salt mist lands on your paint, your lower panels, and in your wheel arches, where it sits and promotes oxidation and bonded contamination that a standard car wash does not fully remove.
Beyond salt, the freeze-thaw cycle accelerates existing clear coat micro-cracks, and UV exposure during long Illinois summers drives oxidation. Industrial fallout from manufacturing activity in the western suburbs adds ferrous contamination to paint surfaces throughout the year. All of this compounds into accelerated paint degradation that, left untreated, makes paint correction both more necessary and more complex than in a mild climate.
The water issue is also specific to this region. Chicago area municipal water, including water in DuPage County communities, contains dissolved minerals that leave hard water deposits on paint when water is allowed to air-dry on the surface. A single session of washing the car and letting it dry in the sun on a warm day can leave mineral deposits that require more than a standard wash to remove. This is a routine problem for local vehicle owners and a routine part of what a professional decontamination process at Hersheys Detailing addresses before any polishing begins.
Paint Correction Before Ceramic Coating: Why Order Matters
This is the most commonly misunderstood sequence in automotive detailing, and getting it wrong is an expensive mistake. A ceramic coating does not hide defects. It amplifies them. A nano-ceramic SiO2 coating bonds to the clear coat surface and cures into an extremely hard, highly reflective layer that magnifies whatever texture and imperfections exist underneath it. Swirl marks, water spot etching, and buffer haze that look moderate on uncoated paint will look significantly worse once a high-gloss ceramic coating is cured on top.
This is precisely why the ceramic coating packages at Hersheys Detailing include a full two-step paint correction as part of the preparation process, not as an upsell. There is no responsible way to install a five-year or eight-year coating over uncorrected paint and tell a customer they are getting a premium result. The correction is not a bonus; it is a prerequisite.
The sequence matters for another reason too. Once a ceramic coating has cured, the only way to address paint defects beneath it is to remove the coating first through heavy polishing, then correct the paint, then reapply the coating. That is a significant cost and time investment that could have been avoided by correcting the paint properly before the first coating installation.
Frequently Asked Questions
How do I know if my car needs paint correction or just a detail?
Check the paint under direct sunlight or shine a single light source across the hood at a low angle. If you see circular, web-like patterns, that is swirl marking. If you see dull, milky areas or haze, that is oxidation or compound haze from previous buffing. A standard detail with wash, wax, and interior cleaning will not remove either. Paint correction addresses defects that are physically in the clear coat surface. If the paint looks flat or hazy regardless of how clean the car is, correction is what you need.
Can paint correction remove deep scratches?
Paint correction removes defects that are within the clear coat layer. If a scratch has gone through the clear coat into the base coat (color layer) or deeper, machine polishing cannot fix it. A practical test is to run your fingernail across the scratch lightly. If it catches, the scratch is too deep for polishing. Those areas typically require touch-up paint or panel blending before any protective coating is applied. A professional detailer will identify this during the paint inspection phase and advise accordingly rather than simply polishing over it and hoping for the best.
How long does a professional paint correction take?
A one-step enhancement on a clean vehicle might take three to four hours. A full two-step correction on a vehicle in average condition typically takes six to ten hours. A three-step full correction on a heavily defected vehicle can exceed twelve hours. These are not quick services, and any shop advertising a full correction in under two hours is almost certainly not doing the multi-stage work the name implies. The decontamination, inspection, panel-by-panel polishing, and IPA wipe-down steps all require time that cannot be compressed without sacrificing quality.
Will paint correction last, or will swirl marks come back?
The correction itself is permanent in that the defects that were removed are gone. However, if you return to the same washing habits that caused the swirl marks in the first place, the marks will return. Brushed automatic car washes, dirty wash mitts, and circular drying motions will reintroduce swirl marks regardless of how good the underlying correction was. Following the correction with a ceramic coating significantly reduces the risk of reswirling because the coating is much harder than clear coat and more resistant to fine scratching. Paired with proper wash techniques using quality microfiber and two-bucket methods, a corrected and coated vehicle can stay in excellent condition for years.
What is the difference between paint correction and paint enhancement?
Paint enhancement is a marketing term that describes a one-step polishing process using a product designed to balance defect removal with finishing gloss in a single pass. It improves the look of the paint meaningfully, especially on vehicles with light swirl marks, but it does not address deeper defects and does not achieve the same level of clarity as a true multi-stage correction. Paint correction, when used correctly, implies at minimum a two-stage process: a cutting or compounding stage to remove defects, followed by a polishing stage to refine the surface. The distinction matters when you are comparing quotes between shops, because both terms are sometimes used interchangeably when they should not be.
Is paint correction worth it on an older high-mileage vehicle?
Yes, in most cases, if the clear coat is still intact. Paint correction is one of the highest-return investments you can make in a vehicle's appearance regardless of age or mileage, precisely because it physically restores the surface rather than masking it. A well-maintained ten-year-old vehicle with corrected and coated paint can look better than a newer car that has never been properly cared for. The caveat is clear coat condition: if the clear coat is already peeling, cracking, or failing, no amount of polishing will fix that, and the vehicle needs a repaint before correction is relevant.
Have you had a paint correction done on your vehicle in the Chicago suburbs? Share what your experience was like and what condition the paint was in before and after - your input helps other owners know what to expect.
References
- One-step vs. multi-step paint correction: stages, compounds, and pad selection explained
- How professional detailers perform paint correction using controlled machine polishing and abrasives
- How paint correction physically removes swirl marks by leveling the clear coat surface
- The science behind paint defects: swirl marks, water spot etching, oxidation, and clear coat depth
- How to remove hard water spots from car paint: stages of water spot damage and correction methods